(This article was updated in August 2018 for use with Visual Studio 2017.)
Moving Beyond Microsoft Access
I’ve written a lot about Microsoft Access over the years and still believe it’s a great training ground for people who want to learn to design database applications. Its user-friendly interface provides an easy learning curve and introduction to the basics of relational databases, data entry forms and report design. If you want to get serious about programming, however, it’s important to expand your skillset beyond Access with tools that are in demand by potential employers and customers.
One of these tools is Microsoft Visual Studio, the development suite that provides access to the .NET family of languages including C# and VB.NET. With Visual Studio, you can create a variety of professional applications from Windows form applications to websites powered by ASP.NET. While Microsoft Access provides some impressive tools for the office power user and even some full-time programmers, Visual Studio is the next step up the development ladder. It enables professional programmers to design any type of solution without being tied to a Microsoft Office installation and without the limitations of the Windows desktop. A couple quick searches of sites like CareerBuilder.com will show you the kind of jobs and salaries that knowledge of Visual Studio can lead to as opposed to Microsoft Access.
One of the things that makes Access so fun to work with is the ability of users to create forms and reports just by dragging and dropping some items and changing a few settings. When considering a move to Visual Studio, some users might be intimidated by the idea of having to learn and write masses of code in order to do the same things. I want to show you that that’s not always the case. In fact, you can create a basic form with which you can read and edit your data in around five minutes. If you follow these steps, you can create a basic Windows program that can be copied and run on other machines.
Creating the Project
For this demonstration, I’m going to use Visual Studio 2017 Express which is available as a free download from Microsoft. Typically, I would also use Microsoft’s SQL Server Express for the database and that’s also a free download. For this demo, I’ll use a simple Microsoft Access data file to show how easily it can interface with Visual Studio.
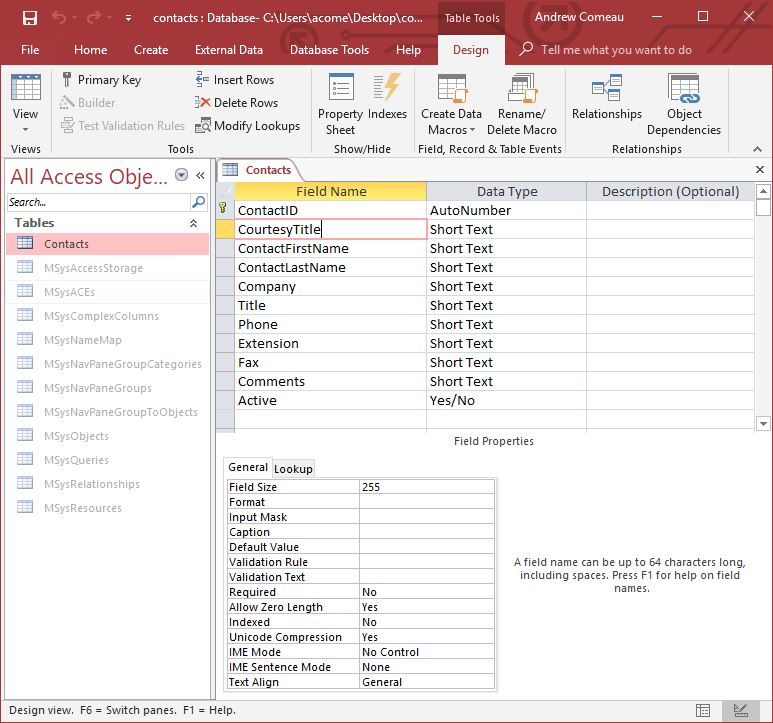
Figure 1 shows the Microsoft Access design view for the Contacts table which I’ll use in this demo. The file itself is an Access database called ‘Contacts.accdb’.
To start, open Visual Studio and create a new project by selecting the ‘New Project’ option from the File menu.
Select the Windows Form application type under the language of your choice. C# is my preferred language and since you won’t see much code in this demonstration, that’s the language I’ll be using.
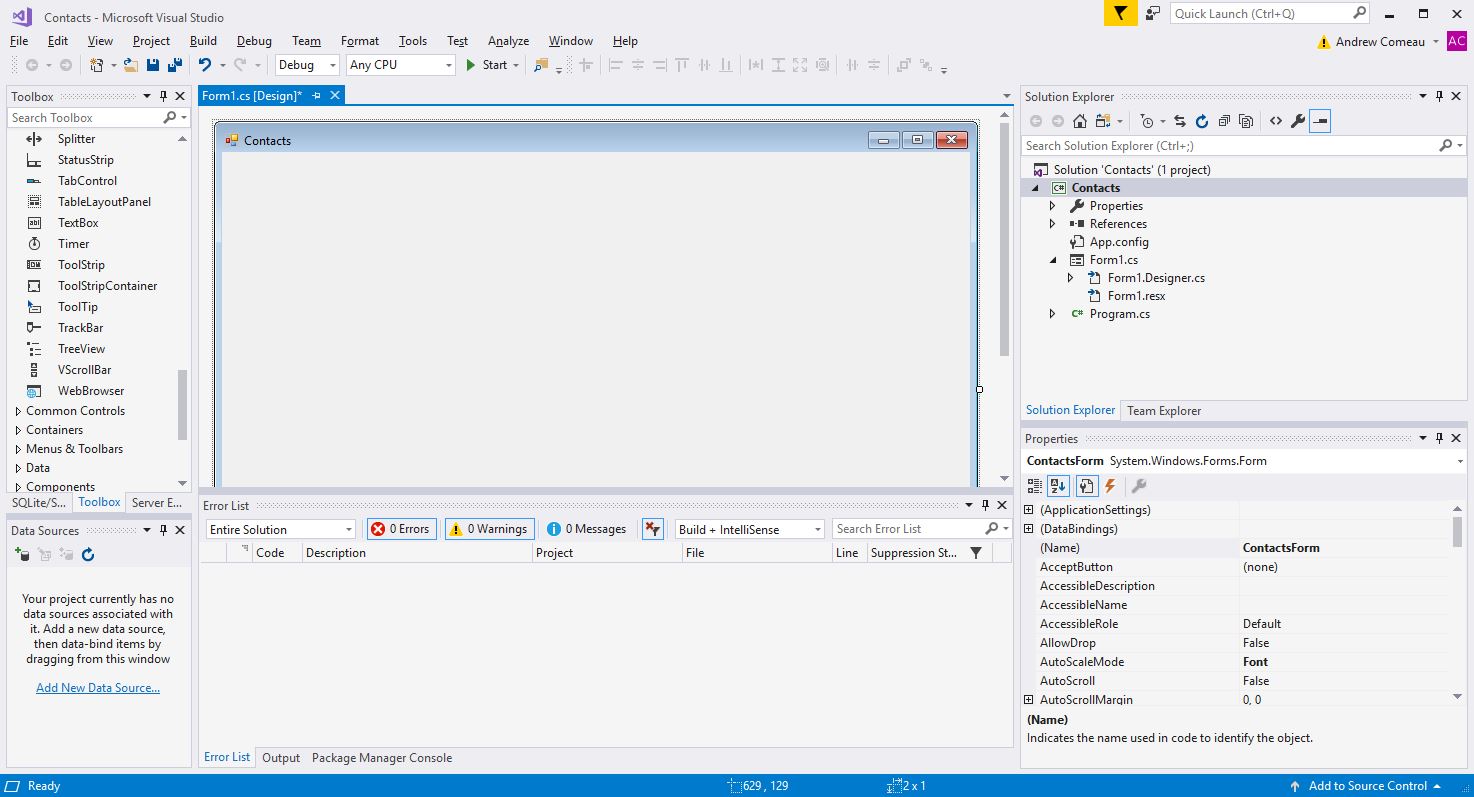
Fill in the name of the project and the location where you want it to be created as shown in Figure 2 and then click the ‘OK’ button to create the project. Visual Studio will take a moment to create the solution and its files and then you should see a screen something like the one shown in Figure 3.
While this looks different from the Microsoft Access environment that you might be used to, the Visual Studio IDE (Integrated Development Environment) is really not complicated once you understand the individual parts:
- Just like in Access, you can drag and drop controls onto the form that you’re building and the panel on the left shows the Toolbox with these controls grouped into various categories. If this panel is not showing, you can select it from the View menu at the top of the screen.
- Under the Toolbox is the Data Sources panel which shows the databases and other data sources that are currently available to use in projects. Visual Studio can work with a variety of different types of data from SQL Server to text files. Microsoft Access is also a recognized format. The individual sources need to be defined in the project before the projects can work with them.
- The Solution Explorer panel on the top right of the screen shows the files that make up the project with ‘Form1.cs’ being the form that I’ll be working with in this demo. The project that I just created is stored within a Visual Studio solution which can contain a number of projects which can work together.
- On the bottom right of the screen is the Properties panel which shows the properties, settings and events for whatever object is active at the time. It’s very similar to the Microsoft Access properties panel but you’ll find a lot more available options.
- In the center, just like in Access, is the form design environment where you can drop controls and configure them for use in the form.
Find related products on Amazon.com …
Meta Quest 2 — Advanced All-In-One Virtual Reality Headset — 128 GB
20% OffGarmin epix Pro (Gen 2) Sapphire Edition, 51mm, High Performance Smartwatch, Advanced Training Technology, Built-in Flashlight, Black
Defining the Data Source
We’ll start by creating the data source for the Access database to be used in the application. There are a couple of ways to do this and often it would be done on the Server Explorer panel by creating a connection to the source. Since this is a local Access file, I want to make the database file itself part of the project so that a copy of the database can be easily distributed with the finished program.
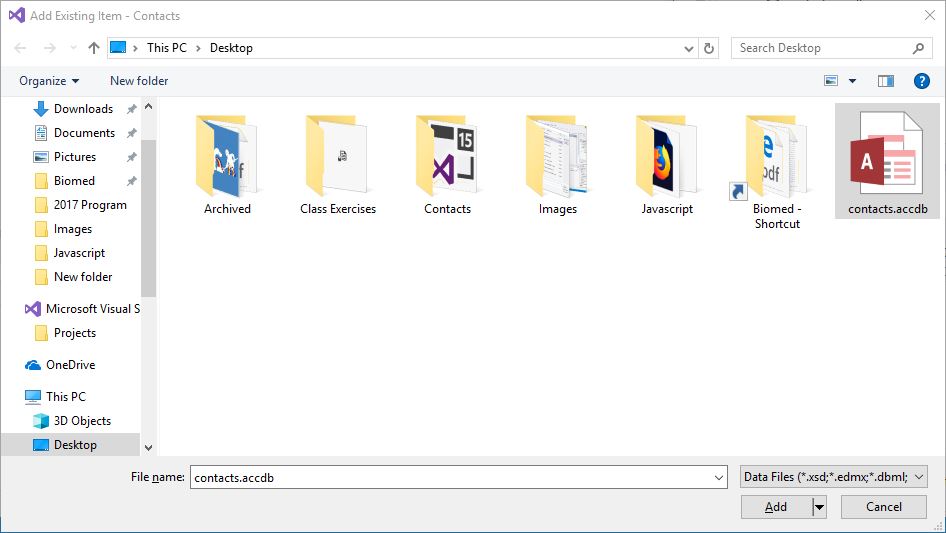
To add a file to the project, right-click the project title under the Solution Explorer and select Add >> Existing Item from the menu that appears or use the SHIFT-ALT-A keyboard shortcut to open the Add Existing Item screen. Then select the Access file that you want to work with. You might need to specify that you want to view ‘All Files’. Select the file and click the ‘Add’ button to add it to the project.
Even if you don’t have Microsoft Access installed, Visual Studio might recognize the file as an Access file and display the screen in Figure 5. You might also need to manually add a Data Source to the project. The Data Sources panel should be showing in the lower-left hand corner of your screen. See Figure 3 for an example. If it isn’t, use the SHIFT-ALT-D keyboard shortcut to display it.

(It is possible that Visual Studio will not recognize the Access file because the file type is not registered as a data provider and will display an error. If this happens, you will need to download and install the 2007 Office System Driver from Microsoft.)
The Data Sources Configuration Wizard shown in Figure 5 will guide you through creating a connection to the Access file you added to the project and selecting the tables for use. Select the following options:
- Choose a Data Source Type: “Database”
- Choose a Database Model: “Dataset”
The wizard will then ask you to Choose Your Data Connection and should show the file that you just added to the database.
After you click Next, the wizard will prompt you to save the connection string which is the connection information your application will use to open and connect to the database. After you save it, you should see a screen like the one in Figure 6.
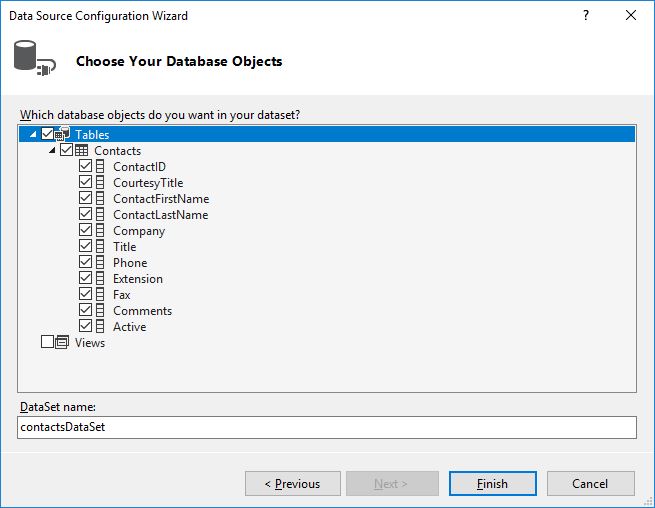
You can choose which tables or queries from the Access database to reference in the application. In this case, I just want the Contacts table and I’m accepting the name ‘contactsDataSet’. Once you click the ‘Finish’ button, the dialog will close and you’ll see a new dataset object under the Solution Explorer by whatever name you choose.
Setting Up the Form
Now that the data is in place, the next step is to create the controls on the form that will display the data. From the Toolbox on the left side of the IDE, select the ‘Data’ category and then select the DataGridView and drag it over to the form as shown in Figure 7.

On the top-right corner of the new DataGridView object, click on the small arrow icon to open the settings menu for the object. The first item on the menu enables you to choose the data source for the form. In Figure 8, you can see how the list drills down to the ContactsDataSet I just created and then to the Contacts table within it.
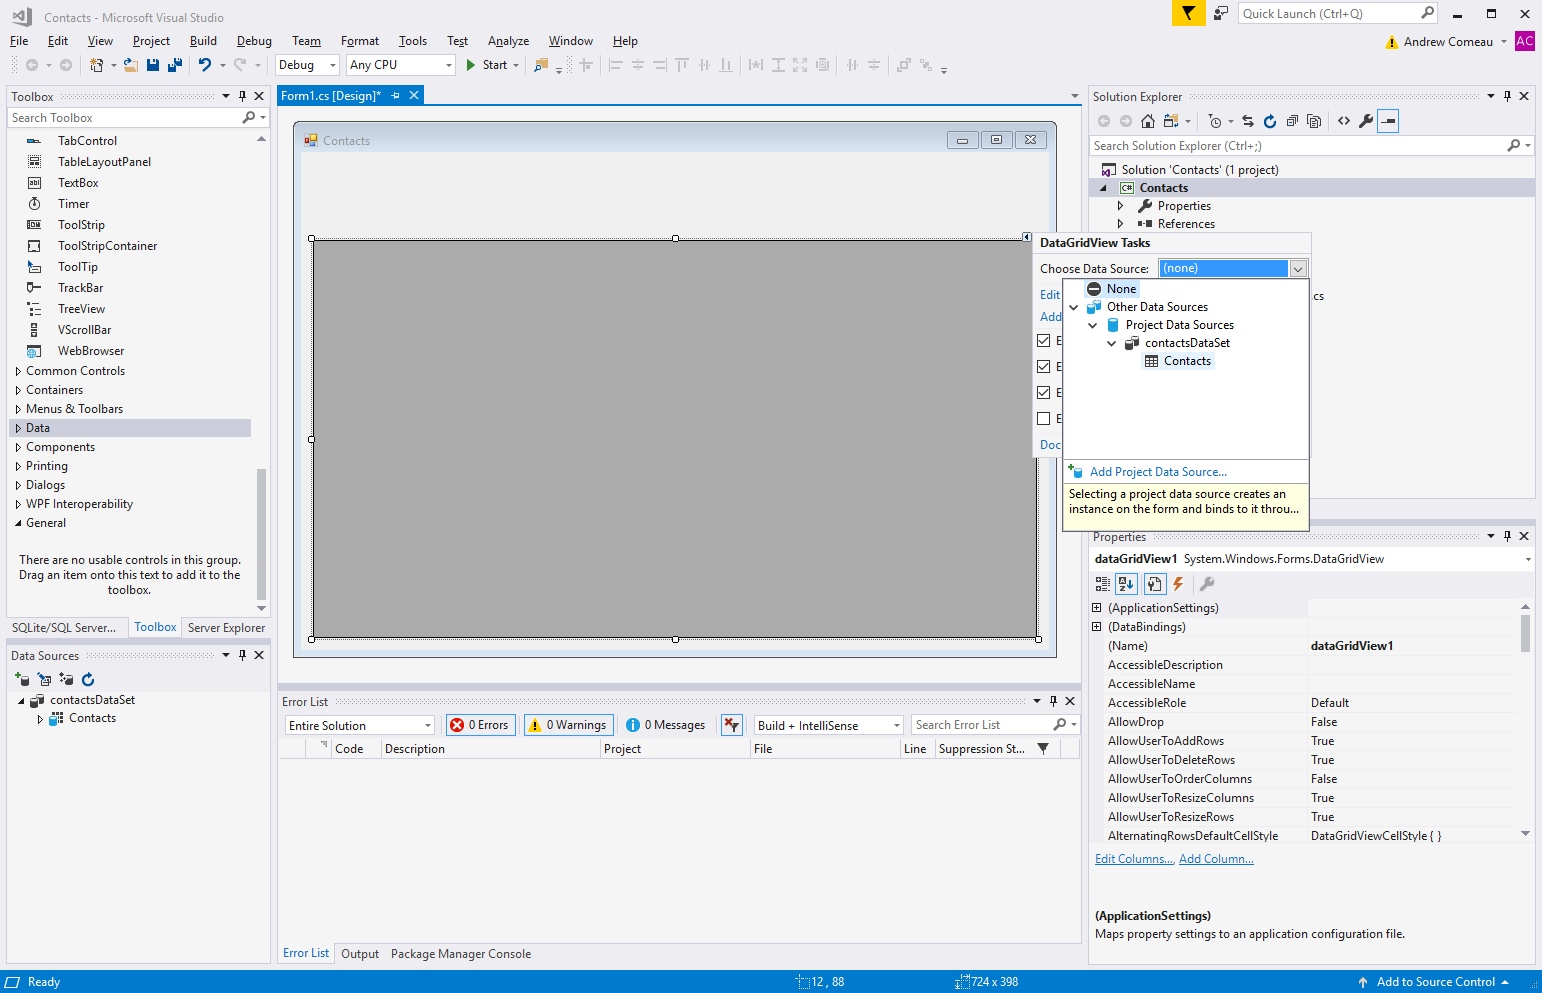
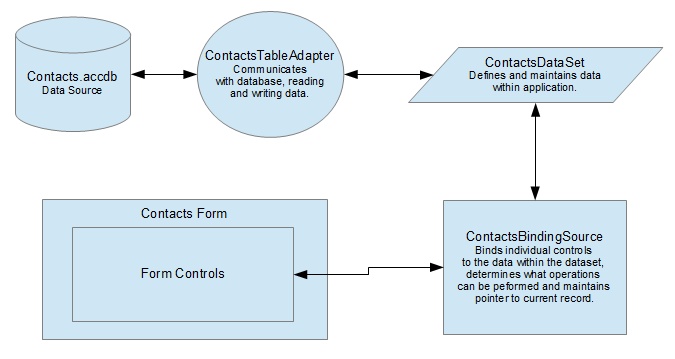
Selecting the Contacts table will bind that table in the dataset to the form’s DataGridView control. As shown in Figure 9, the DataGridView now shows the field names from the table and Visual Studio adds a few objects in the form design area. These are data objects that are used to manage the various phases of communication between the controls on the form and the database. They cannot be visually represented on the form itself so Visual Studio adds these icons to enable their settings to be managed as needed.

- The contactsDataSet object shown in Figure 9 is an instance of the ContactsDataSet class that was created earlier. It’s specific to this form and holds the actual data that the form will work with.
- The BindingSource object is used to manage the communication between the controls and the dataset. It enables a control to bind directly to a specific field or table and its settings determine whether records can be added or edited. The BindingSource also maintains the control’s pointers to the current record within the dataset.
- Finally, the TableAdapter manages the communication between the program and the actual database, in this case the Access file. It includes the connection information and queries that are used to read and write data.
This is a little more detail than you needed to deal with when designing a Microsoft Access database but it’s not that complicated once you know how the parts work together. Figure 10 shows the components that you’ve seen so far and how they interact.
Find related products on Amazon.com …
Access 2019 Bible
42% OffAccess For Dummies (For Dummies (Computer/Tech))
42% OffAdding a Navigation Bar
Data grids are a bit easier to navigate if there’s a navigation bar to zip between the first and last records, add new records, etc.. With what you’ve seen so far, this is a snap because the navigation bar is just another form control that uses a BindingSource to access the data in the dataset.
From the Toolbox, select the BindingNavigator control and drag it to the top of the form. It will automatically snap into position just under the title bar as shown in Figure 11.

Next, select the new navigation bar and find the Binding Source property for the bar under the Properties panel. This needs to be changed to match the BindingSource of the DataGridView control so that both the grid and the bar are bound to the contactsDataSet object.

Once this is done, the navigation bar and data grid will be bound to the same data source and synced to the same current record by the contactsBindingSource. You can try running the application by pressing F5 or clicking the Start button on the toolbar. When the form loads, play around with both the navigation bar and the grid and notice how changing the record in one will change the other. You can also click on the column headers to sort the table by that column.
At this point, working with your data in Visual Studio comes down to seven simple steps without a single line of code written:
- Create a new project.
- Specify a data source and use the wizard to generate a dataset.
- Add a datagrid control to your form.
- Set the datagrid’s data source to the appropriate table within the dataset that you created. Visual Studio will create the necessary data objects on the form.
- Add a navigation bar.
- Set the navigation bar’s BindingSource to match the datagrid’s BindingSource so that the two are in sync.
- Run the application.
Saving Your Changes
Being able to view the data is great but you’ll also want to make changes and save those changes back to the database. This is where you’ll write your first code but it’s only a couple of lines.
First, create a button on your new form under the data grid by dragging a Button control over from the ‘All Windows Forms’ category on the Toolbox. You’ll use this button to save the data after any changes.
You can assign names to any objects or controls you create in Visual Studio. I haven’t bothered with specific names to this point but go ahead and set the ‘Name’ property for the new button to ‘cmdSave’ and set the Text property to ‘Save Changes’. You can resize the button if all of the text does not display.
To add the necessary code, just double click on the new button. The code environment will appear and a new Click event will be automatically created for the button. Change the event so it appears as follows:
private void cmdSave_Click(object sender, EventArgs e)
{
  contactsBindingSource.EndEdit();
  contactsTableAdapter.Update(this.contactsDataSet);
  MessageBox.Show("Changes saved successfully.", "Saved ...");
}
That’s all the code that’s actually needed and even the third line is only a courtesy to notify the user that the changes are saved. Of course, this doesn’t include such things as error handling and comments which are important to learn as you work with Visual Studio.
Testing Your Program
In order to test the Save Changes button, you need to do something slightly different to run it. From the Project menu at the top of the screen, select ‘Show All Files’ or click the corresponding icon at the top of the Solution Explorer. In the Solution Explorer panel, you’ll notice a couple new items appear.

Although the Access database is included in the project itself, the changes are not actually being made in that copy of the database. Whenever you run the application in Visual Studio, a new EXE file is built for your program in either the Debug or Release folder depending on which on you select in the Configuration Manager screen, which you can select from the Build menu in Visual Studio. Visual Studio also copies the Access database to this folder and runs the EXE which makes the changes to that copy of the database.
The reason for the Debug and Release configurations is so that programs can be tested with code that will run in Debug mode but be inactive when the developer switches to Release mode. Visual Studio also optimizes the code for distribution to other users when it’s built under Release mode. Visual Studio defaults to the Debug configuration for a new project so right-click the Debug folder in the Solution Explorer and select the ‘Open Folder in File Explorer’ option. This will show you the folder as it exists in Windows. You can also navigate to it through Windows by opening the folder where you saved your solution when you created it.

To run the program and ensure that it’s saving the changes, just double-click on the EXE file, double-click on any of the cells to edit them, make a few changes and then click the Save button. If you close the program and re-run it, your changes should still be there. Because you’re running the compiled executable instead of instructing Visual Studio to build a new one, it will make the changes to the existing database right there in the same directory as the EXE file. Of course, they’ll be overwritten the next time you build the EXE from Visual Studio so if you want to keep changes you make while testing, be sure to copy the database elsewhere.
Distributing your Program
When you build your program under the Release configuration, the EXE that is created in the Release folder is actually the finished product intended for distribution and deployment. An advantage of using Visual Studio is that so long as someone has the .NET framework installed on their machine, you can very often just copy the EXE and any supporting files you need to a folder on that machine, create a shortcut and you’re in business. In the case of the program above, it would just be ‘Contacts.exe’ and ‘Contacts.accdb’. There is also a Publish command from the Build menu in Visual Studio that will publish your application with an installation program that can be run in order to install it on another machine. You can learn more about this by researching ‘ClickOnce deployment’.
Conclusion
Of course, there’s a lot more to building and deploying professional applications with Visual Studio than shown here but by following the steps in this article and exploring some of the settings available, you should get at least a beginning comfort level with the Visual Studio environment. There are also tons of articles and tutorials online to support programmers at all levels so don’t be afraid to jump right in.
Find related products on Amazon.com ...








![Audacity - Sound and Music Editing and Recording Software - Download Version [Download] #1](https://m.media-amazon.com/images/I/510mwJSk09L._SL100_.png)
![Audacity - Sound and Music Editing and Recording Software - Download Version [Download] #2](https://m.media-amazon.com/images/I/71HecmJE3IL._SL100_.png)
![Audacity - Sound and Music Editing and Recording Software - Download Version [Download] #3](https://m.media-amazon.com/images/I/61pBBRoGhAL._SL100_.png)
![Audacity - Sound and Music Editing and Recording Software - Download Version [Download] #4](https://m.media-amazon.com/images/I/71Jw6wtwL+L._SL100_.png)

![WavePad Free Audio Editor – Create Music and Sound Tracks with Audio Editing Tools and Effects [Download] #1](https://m.media-amazon.com/images/I/71ePKI3-0tL._SL100_.png)
![WavePad Free Audio Editor – Create Music and Sound Tracks with Audio Editing Tools and Effects [Download] #2](https://m.media-amazon.com/images/I/71kkPFLKdDL._SL100_.png)
![WavePad Free Audio Editor – Create Music and Sound Tracks with Audio Editing Tools and Effects [Download] #3](https://m.media-amazon.com/images/I/71XNsD5NUGL._SL100_.png)
![WavePad Free Audio Editor – Create Music and Sound Tracks with Audio Editing Tools and Effects [Download] #4](https://m.media-amazon.com/images/I/71XJE-rWhbL._SL100_.png)
![WavePad Free Audio Editor – Create Music and Sound Tracks with Audio Editing Tools and Effects [Download] #5](https://m.media-amazon.com/images/I/71rpUeHuvtL._SL100_.png)