The Switchboard Manager in Microsoft Access makes it easy to create a system of menus that will enable your users to navigate through your application. It also relieves you of the need to manage multiple menu forms and macro calls.
Sometimes, however, you might want to keep all but a few users out of specific areas, even if it’s just a password to discourage the curious. This is one thing the Switchboard Manager doesn’t offer and I’d like to show you one method for achieving this here. I want to stress that this method is not truly secure. On it’s own, it won’t prevent a user from hitting F11 and browsing through the database. A power user who wants to see those areas could defeat this method pretty quickly. It will keep the merely curious and inexperienced users out, however, and could be combined with other measures to add more security.
When you use the Switchboard Manager, Access creates the Switchboard Items table with the information it needs to execute the commands when you click on one of the buttons. The Switchboard form uses code to retrieve this information and populate the menu items on the form. First, we’ll need a way to store the passwords for the options. Then, we’ll need to update the code to get the user to input a password and verify it against the stored password.
The Switchboard Items form is the most obvious place to store the password and, in order to do that, we need to add another field to the table. Make sure that all forms, especially the Switchboard form, are closed and then right-click on the Switchboard Items table to open it in design view.

In Figure 3, I’ve added the Auth field to the table, set the Field Size to 25 and Allow Zero Length to No. I personally don’t want passwords longer than 25 characters. Once you save the table, you can add passwords for specific items just by typing them into the record for the options that need to be protected. Remember that the table contains entries for the individual switchboards themselves and these are marked by an ItemNumber value of 0. In Figure 4, the protected record is for the actual Administration menu while the one further up the list is the menu item that calls it.

Once the table is changed, we need to change the code to use the password and this depends on the version of Access the database was created in. In Access 2010 and later, the Switchboard Manager was changed to use the new enhanced macros which allow for repeating actions, conditional statements and other features. In Access 2007 and prior, the Switchboard Manager uses Visual Basic for Applications (VBA) code to process the menu clicks.
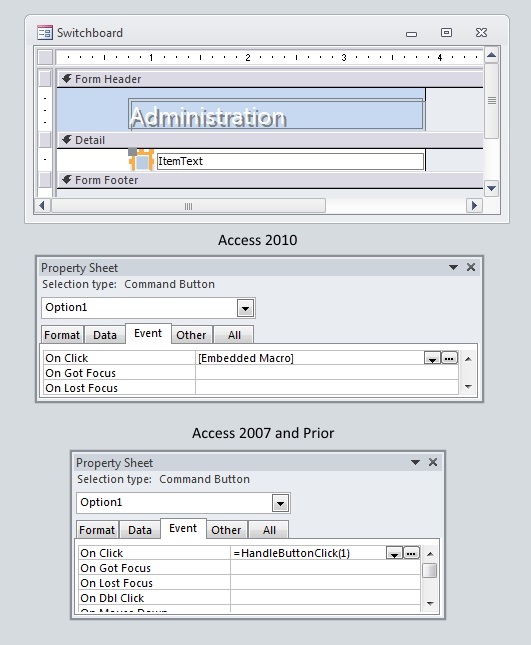
Open the Switchboard form in design view and click on one of the menu buttons. If necessary, right-click and select Properties to view the Property Sheet for the button. Then, select the Event tab in the Property sheet.

Access 2010
If you’ve created the switchboard in Access 2010, you should see the “[Embedded Macro]” notation under the On Click event. Click on the ellipsis button (…) on the right and Access will open the macro for editing.
Starting with Access 2010, the enhanced macros allow for conditional statements where the macro tests for a condition such as a specific setting or variable and then takes actions based on what it finds. The Switchboard form reads the Items table for the fields related to the menu being displayed and populates the menu command buttons and descriptions with that information. The Switchboard macro then reads the Command field value associated with the button that you click and uses a conditional statement to take the appropriate action. A Command value of 1 means to load another menu, commands 2 and 3 indicate that the specified form should be open, etc.. You can see what each command does by examining the macro to see what actions it takes.
In this example, we’re going to change the macro to check for the presence of a password within the Items table before carrying out the command to change menus.

In the macro editor, you can add actions to a macro by dragging them to the editing area from the Action Catalog on the right as shown in Figure 6. You can also rearrange them by dragging them from one point to another and remove them completely with the DEL key or by clicking on the X shown on the right of the editing. In the screenshot, I have the mouse hovered over the SetTempVar action which sets a temporary variable for the program to work with. In this case, it’s looking up the current value of the Argument field which comes from the Switchboard Items table.
The first thing to do is add another temporary variable and set it to the value of whatever password is stored for that menu. To do this, select the SetTempVar action from the Action Catalog on the right. You’ll find this action under Actions >> MacroCommands in the listing. Drag the action over to the menu and drop it under the first SetTempVar statement. Once the macro action is in place, set its options as follows:
Name: Password

Expression = DLookUp("Auth" , "Switchboard Items" , "[SwitchboardID] = " & TempVars("SwitchboardID") & " AND [Command] = 0")
The expression above looks a little complicated but it simply uses the DLookup function to search the Switchboard Items table. It selects the record where the SwitchboardID is equal to the SwitchboardID temporary variable defined earlier and the Command field equals 0. It then reads the value of the Auth field from that record to get the expected password. Once you’ve completed this action, it should look like the one in Figure 7.

Now that we have the expected password, we need to carry out the following actions:
- Check if there actually is a password by testing the length of the value retrieved in the last step to see if it’s greater than 0.
- If there is a password, alert the user and get them to enter a password to test.
- If the user entry does not match the expected password, notify the user and quit the macro. Otherwise continue with the requested action.
To save time, I’m going to post the finished macro here so that you can copy it.
The macro above is actually an example of code that uses an algorithm or a specific set of steps to arrive at a result. In this case, it tests for two conditions and only takes action if each of them evaluates to True.
- The macro first tests to verify that the length of the password retrieved is greater than 0. If it’s Null, this will be False and the macro will skip over the next If statement.
- If there is a password, the macro displays an input box asking the user for a password. The user entry becomes the value of the InputBox function and that value is tested against the Password variable already defined. It’s actually testing for a negative match ( < > ). If there isn’t a match, it displays the message box and stops the macro. Otherwise, the macro continues and loads the menu.
Note that the If statements can be nested within each other. After you drag the first If statement into the macro, you can add another If statement as the new action. Just don’t forget to set the condition that the first one is testing for.
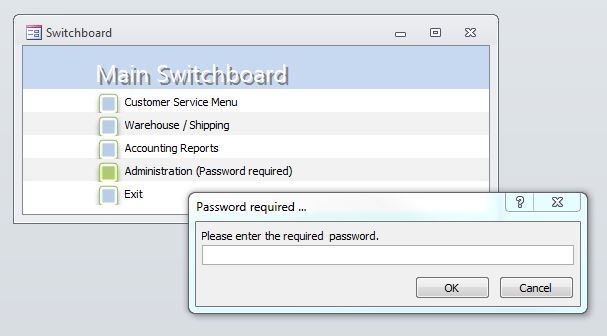
Once you’ve added the macro lines shown above, simply save the macro, close the editor and load your Switchboard form. When you click on the option with the password enabled, you should see the input box requesting the password.
Access 2007 and earlier …
If you’re using an older version of Access and see the =HandleButtonClick() text for the On Click event, you will need to open the VBA environment with the Alt-F11 key combination and change the HandleButtonClick() function to carry out the same actions as shown in the macro above.

Figure 9 shows the HandleButtonClick() event from the Switchboard form in an earlier version of the application. It might look a little intimidating if you haven’t used VBA before but it generally does what the Switchboard macro did earlier and the Visual Basic code isn’t too hard to decipher if you take it line by line.
The change you need to make is pretty simple.
- Near the top of the function, you should see the three lines from the screenshot that start with DIM. These are variable declarations and you need to add a fourth one:
Dim strPass As String
- The Select Case statement uses the Command value to decide what action to take. Immediately after the Case conCmdGotoSwitchboard statement, add the following code:
'If there's a password specified for the switchboard, prompt the user for it and verify.

strPass = nz(DLookup("Auth", "Switchboard Items", "[SwitchboardID] = " & rs![Argument] & " AND [Command] = 0"), "")

If Len(strPass) > 0 Then
'If the entry is incorrect, notify the user and exit.
   If InputBox("Please enter the password for this option.", "Password required ...") <> strPass Then
      MsgBox "That password is incorrect. Please verify the password and try again.", vbOKOnly
      Exit Function
   End If
End If
That’s it. After you’ve added the code shown above, select Debug >> Compile … from the top menu and close the VBA environment. When you open the Switchboard form and click on the protected option, you should get the password request box
Conclusion
This example focused on password protecting entire switchboard menus by placing the password on the menu record itself rather than the buttons calling it. It’s possible that a switchboard page could be called from multiple menus within an application and this would ensure protection wherever it was called from.
On the other hand, you might want to protect specific menu options to forms or reports or you might choose to protect a menu on one switchboard page and not on another page that was protected itself. There are a few things to remember if you adapt these instructions for protecting specific menu options.
- The additional lines in the macro or the VBA code would need to be added outside the statements that evaluate which command has been requested so that they are called regardless of the command.
- The DLookup function that retrieves the password would need to reference different fields within the Switchboard Items table in order to get the right record. Both the macro and the VBA function make all fields from the table available so you could search by the ItemText or by the SwitchboardID and ItemNumber. It’s just a matter of referencing them correctly.
With these hints, I encourage you to play around with this method of protecting the menus to see how you can adapt it to your needs and even make it more secure.
While you’re here, check out some of the other articles on Microsoft Access right here on ComeauSoftware.com.


excelente artículo.