Update: A video update to this article for Windows Server 2016 / 2019 is available on YouTube. I’m leaving this version up as a general guide for issues you might encounter in this type of installation. Please take this into consideration when downloading components.
One of my latest projects was setting up WordPress, the popular content management system, on a client’s web server which was running Windows Server 2008. WordPress requires installations of MySQL for the database back-end and the PHP scripting language in order to serve up the WordPress content. On a local Windows machine, I’d probably just use a pre-configured WAMP (Windows, Apache, MySQL, PHP) stack package like XAMPP which is installed quickly and includes all the necessary components. That’s not quite an option in a professional environment, though. I was also working with Internet Information Services (IIS) 7.5 for the web server instead of Apache so the process is a little more involved.
Click here to read more about using XAMPP to create a local installation of WordPress.
In addition to installing the components, PHP must be be configured to work with MySQL so that WordPress, which maintains all the site content in MySQL, can access the database as needed. Having only previously done this in Linux with Apache as the web server, I had to do a little research. It was not painless – WordPress is a little finicky on IIS / Windows and I had to research my way past a couple stubborn errors.
For everyone’s benefit, I thought I’d share what I learned here. I’ve tested this process on both Windows Server 2008 and 2012 and noted the differences where necessary.
Pre-requisites
By the time the process is finished, you will probably need both the Visual C++ Redistributable for Visual Studio 2012 (32-bit) and the Visual C++ Redistributable for Visual Studio 2013 (64-bit). The MySQL edition will automatically install the 2013 edition but you will still need the 2012 edition for PHP if you don’t already have it.
Installing MySQL
There are a couple options for installing MySQL on Windows. It can be downloaded as a ZIP file, unzipped into the directory of your choice and run via the command line or you can install it as a Windows service with all the bells and whistles. I personally like to run it as a service and let Windows manage things. Whatever option you choose, all the downloads are available from http://dev.mysql.com/downloads/mysql/.
I chose the MySQL Installer 5.6 for Windows which installs everything. The installer is 32-bit but installs either the 32-bit or 64-bit version of MySQL depending on your system. There’s also the option to choose a small file that will perform an installation from the web or the large file if you’re not certain you’ll have a connection available.
I chose the Custom setup type from the first option screen so I could choose which components I wanted on the machine. For this project, the server itself, MySQL Workbench and MySQL Notifier were enough. MySQL Notifier alerts the user to any change in the server’s status. I didn’t specifically need Workbench for a WordPress installation but it doesn’t take up much room and might come in handy at some point.
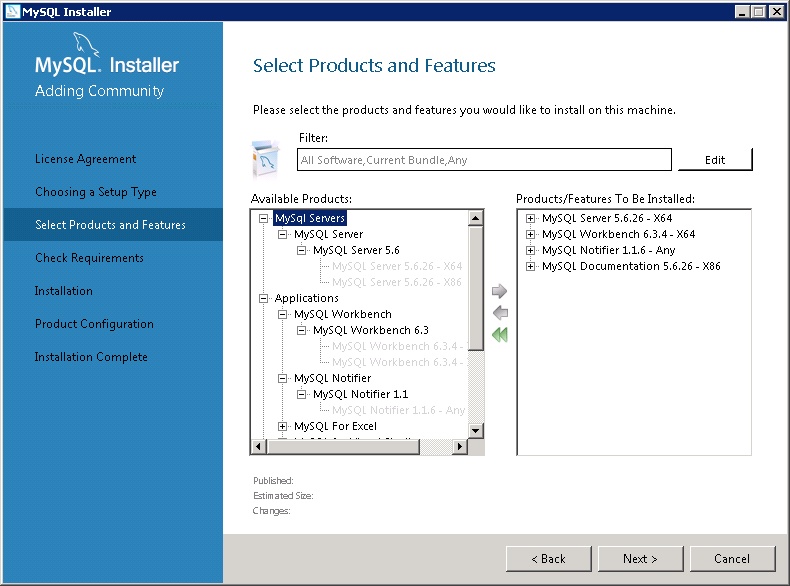
If you’re installing MySQL Workbench, you might need to install the Microsoft Visual C++ 2013 Runtime in order to complete the installation. The Installer will notify you of this or any other failing requirements and give you the chance to fix them without stopping the installation routine.
The rest of the Installation Wizard screens are pretty self-explanatory. Under Type and Networking, I chose Server Machine since this would actually be a web server and I went with the standard system account for the Windows service screen.
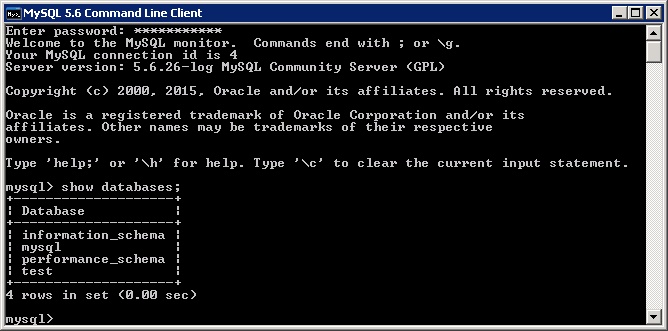
After the installation finishes, it will offer to open MySQL Workbench where you can ensure that you’re able to login to your new database server. Another option is to open the MySQL 5.6 Command Line Prompt from the Start menu and type in the password that you set for the MySQL root account.
While you’re here, you might as well create the MySQL database for WordPress to use. You can do this through MySQL Workbench if you’ve installed it or through the MySQL Command Line with the following commands:
CREATE DATABASE wordpress;
USE wordpress;
CREATE USER 'wpuser'@'%' IDENTIFIED BY '<password>;
GRANT ALL ON wordpress TO 'wpuser'@'%';
With these commands, you create a WordPress database and set it as the default in your MySQL session. Then you create an administrative user for WordPress (so you’re not using the server root user) and grant that user all privileges on the WordPress database. You can use the user name and passwords of your choosing. Just be sure to store them in a safe place.
If you’re using the command line, type ‘exit’ to leave MySQL and then ‘exit’ again to exit the command prompt.
(Article continues below ad.)
Find related products on Amazon.com …
WavePad Free Audio Editor – Create Music and Sound Tracks with Audio Editing Tools and Effects [Download]
$0.00 (as of April 19, 2024 02:55 GMT -04:00 – More infoProduct prices and availability are accurate as of the date/time indicated and are subject to change. Any price and availability information displayed on [relevant Amazon Site(s), as applicable] at the time of purchase will apply to the purchase of this product.)Audacity – Sound and Music Editing and Recording Software – Download Version [Download]
$2.22 (as of April 19, 2024 02:54 GMT -04:00 – More infoProduct prices and availability are accurate as of the date/time indicated and are subject to change. Any price and availability information displayed on [relevant Amazon Site(s), as applicable] at the time of purchase will apply to the purchase of this product.)Installing PHP
Note: The 2021 update to this article demonstrates how to perform the configurations of both IIS and PHP through Microsoft’s Web Platform Installer. The information below details a manual configuration which might still be useful for verification of settings.
PHP doesn’t have an installation routine but you will need to edit the configuration files. I’d like to offer a big “Thank You!” to HowToGeek.com for providing the tutorial that got me started with this process.
You can download the Windows PHP files from http://windows.php.net/download. The non-thread safe edition is required when working with IIS and I stuck with the 32-bit version since, as of this writing, the 64-bit editions are still labeled as experimental. I’m using the current stable version, 5.6.13.
After you’ve downloaded the PHP files, unzip the package to the directory of your choice on your hard drive. I chose c:\php to keep things simple. The package includes a php.ini-production file which you will need to rename as php.ini and copy to your c:\windows directory after making a few changes. This file holds keys and settings, many of which are commented out and can be uncommented to apply specific settings as needed.
In your favorite text editor, uncomment the following keys in php.ini by removing the semi-colon from the beginning of the line and change the settings as follows:
- cgi.force_redirect = 0 (around line 753)
- fastcgi.impersonate = 1 (around line 780)
- Set extension_dir to the ‘ext’ folder in the path where you stored the PHP fies (i.e. ‘C:\PHPext\’). (around 736)
- date.timezone should be set to the time zone of your server (around line 926)
The last setting is a string value (without quotes around it, i.e. America/New_York). You can find a list of appropriate values at http://php.net/manual/en/timezones.php.
In order for PHP to function with MySQL, you will also need to uncomment the following lines in the Windows Extensions section.
extension=php_curl.dll
extension=php_mbstring.dll
extension=php_mysql.dll
extension=php_mysqli.dll
The php_curl.dll extension is to enable WordPress to retrieve and display product news updates. Without it, you’ll see an error message on your desktop every time you log in.
Configuring IIS
After you’ve setup PHP, you’ll need to configure IIS to work with PHP.
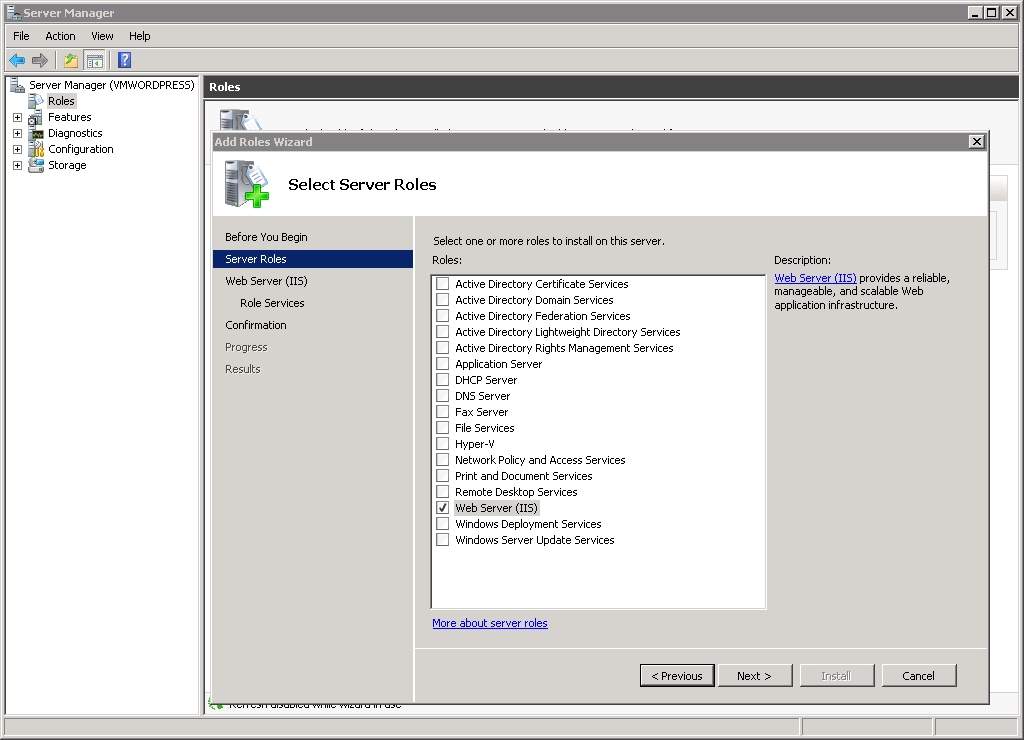
First verify that the machine has been assigned the role of a web server and that CGI is installed as a service under IIS. On Windows Server, You can do this by opening the Windows Server Manager (not the IIS Manager) and selecting Web Server (IIS) under Roles. If this option does not exist, right-click on Roles under the Server Manager tree and add it.
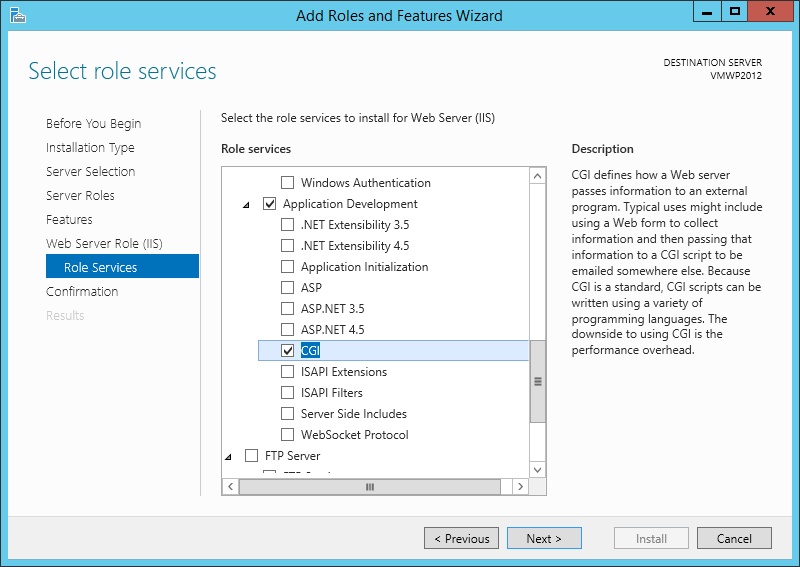
Be sure to select the CGI option under Application Development in the Add Roles wizard. If the web server is already installed but CGI does not show as installed under the Application Development group, you can add it by clicking on Add Role Services and selecting it.

The process is the same in Windows Server 2012 although the Add Roles Wizard has gotten an overhaul.
After the web server role and CGI service have been established, check under the Internet Information Services Manager for the FastCGI Settings option. This should be present if you’re running IIS 7.5. If your running IIS 7, you might need to install the IIS 7 Administration Pack which can be downloaded from Microsoft.
You will need to add the php-cgi.exe application to IIS under the Fasts CGI settings. Right-click in the FastCGI settings panel and choose Add Application.
The Path setting needs to point the to EXE file. Under the FastCGI Properties, change the Instance MaxRequests setting to 5000. Under the Environment Variables, add a new variable to the collection called PHP_MAX_REQUESTS and set its value to 5000. Click OK on both screens to accept both settings.
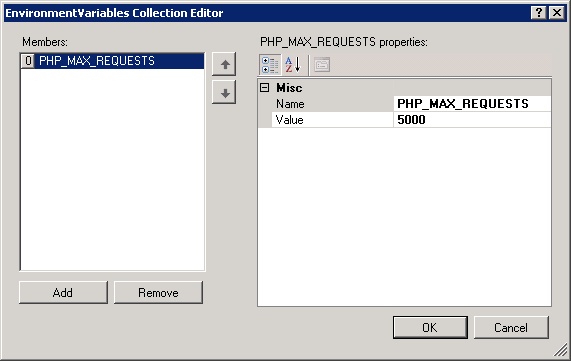
Now that PHP has been added as a FastCGI application, you can add a handler mapping so that IIS will know what application to use when it gets a request for a PHP file. Select the Handler Mappings icon under the IIS home screen. Then click on Add Module Mapping under the Actions menu or right click within the list of mappings and select it from the context menu.

Set the options as shown above:
Request path: *.php
Module: FastCGIModule
Executable: (path to your php-cgi.exe file)
Name: PHP
After you click OK, IIS will ask you to verify the creation of a FastCGI application. Click Yes.
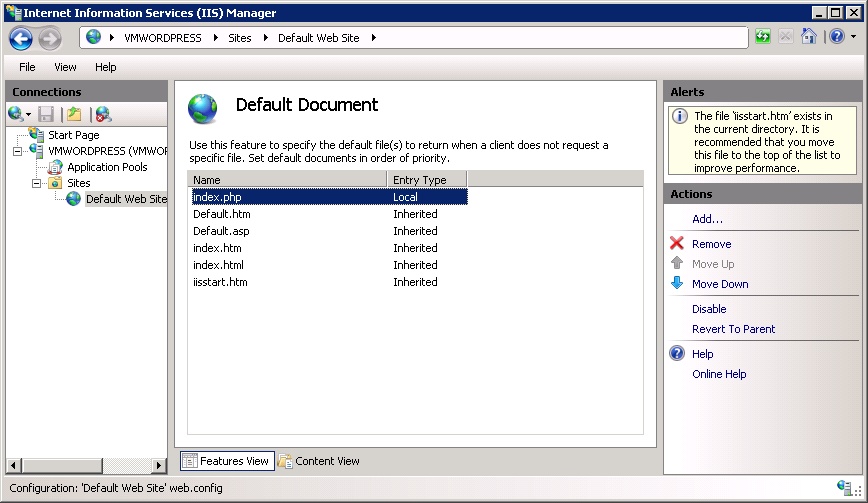
Next, select the Default Document icon in IIS and add ‘index.php’ to the list of possible default documents for the site.
At this point, you will need to restart IIS to ensure that all changes are applied. You can restart it from the Actions menu in IIS or open a command window in Administrator mode and type iisreset at the prompt. After IIS stops and restarts, type exit to close the window.
IIS creates a directory called c:\inetpub. The c:\inetpub\wwwroot folder is where your web files can be stored and served from when requests come in to the web server. To ensure that PHP is running and working with MySQL, create a new text file in this directory with the following text.
<?php phpinfo(); ?>
This is a basic PHP command that tells the browser to display all PHP settings. Name the file phpinfo.php and store it in your wwwroot directory. When you enter http://localhost/phpinfo.php in your web browser, IIS should return the PHP settings page. You’ll need to scroll down or search the page to ensure that it has a section for MySQL as shown in the image below.

If the MySQL section is not present, you’ll probably get the following error when you try to install WordPress:
“Your PHP installation appears to be missing the MySQL extension which is required by WordPress.”
You also might get the following error when trying to bring up the PHP settings:
HTTP Error 500.0 – Internal Server Error
c:\php\php-cgi.exe – The FastCGI process exited unexpectedly
Error Code 0xc0000135
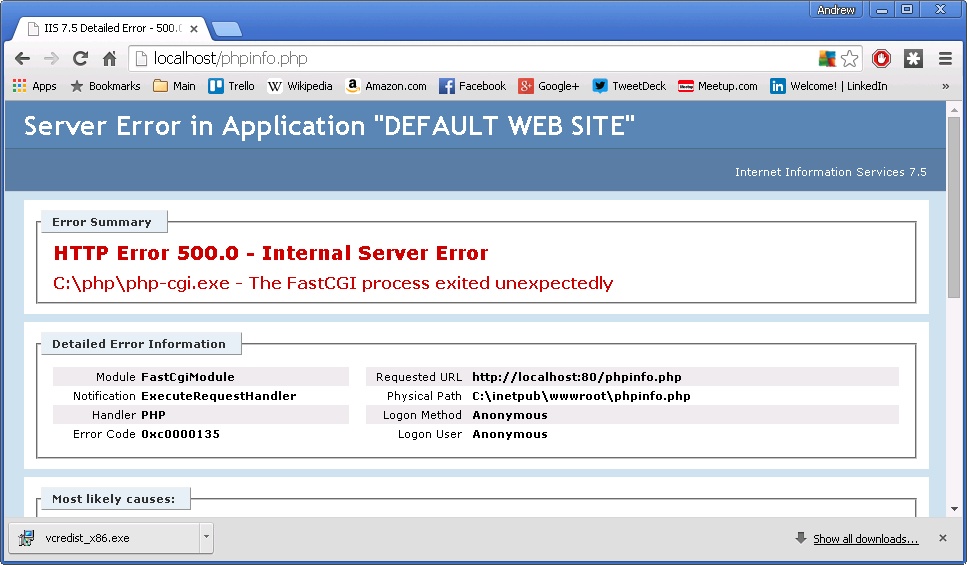
After verifying that you’ve correctly completed the installation steps so far, the next thing to do is to install the 32-bit version of the Visual C++ Redistributable for Visual Studio 2012 which you can find at http://www.microsoft.com/en-us/download/details.aspx?id=30679. Be sure to get the 32-bit version regardless of your system type as the 64-bit version will not fix the error. After you install this package, you should be able to reload the phpinfo file and view the settings page.
For one final step, you should download and install the URL Rewrite module in IIS. When using IIS, this might be needed to support custom permalinks for your pages and blog posts in WordPress. It can also be obtained directly from IIS.net.
(Article continues below ad.)
Find related products on Amazon.com …
WavePad Free Audio Editor – Create Music and Sound Tracks with Audio Editing Tools and Effects [Download]
$0.00 (as of April 19, 2024 02:55 GMT -04:00 – More infoProduct prices and availability are accurate as of the date/time indicated and are subject to change. Any price and availability information displayed on [relevant Amazon Site(s), as applicable] at the time of purchase will apply to the purchase of this product.)Audacity – Sound and Music Editing and Recording Software – Download Version [Download]
$2.22 (as of April 19, 2024 02:54 GMT -04:00 – More infoProduct prices and availability are accurate as of the date/time indicated and are subject to change. Any price and availability information displayed on [relevant Amazon Site(s), as applicable] at the time of purchase will apply to the purchase of this product.)Installing WordPress
The final and easiest step is to install WordPress on your new IIS web server. The latest version can be downloaded directly from WordPress.org (https://wordpress.org/download/) and the installation goes very fast. My video on creating a local WordPress site with XAMPP also includes a demonstration of how to install WordPress.
Once you’ve created the database, unzip the WordPress download file into your c:\inetpub\wwwroot folder. You can keep all the files in a WordPress subdirectory of this folder or put them directly in wwwroot. It’s probably best to use the subdirectory in case you want to install other applications.
Make a copy of the wp-config-sample.php file from the WordPress directory and name it wp-config.php. Then edit the file to change the following settings, substituting the user name and password that you select:
/** The name of the database for WordPress */
define('DB_NAME', 'wordpress');
/** MySQL database username */
define('DB_USER', '<username>');
/** MySQL database password */
define('DB_PASSWORD', '<password>');
/** MySQL hostname */
define('DB_HOST', 'localhost');
Unless you maintain the MySQL installation on a separate machine, the host name of ‘localhost’ can stay the same as you’re referring to the local MySQL installation.
After you’ve made these changes, load the wp-config.php file in your browser.
http://localhost/wordpress/wp-config.php
This will actually run the script within the file and start the installation.
This should go smoothly but if you do run into an error, WordPress is not the most helpful with its messages. Here are a couple that you might see.
- A blank page with ‘No input file specified’. Re-check the address in your browser and make sure it matches the location of the wp-config.php file.
- A redirect loop error page. Again, check the browser address. The initial script should take you to the wp-admin/install.php file within your WordPress directory. Instead, it might be something like “http://localhost/wordpress/wp-config.php/wp-admin/install.php”. You can manually redirect the browser to the actual file if necessary.
- Error establishing database connection. Check the settings in your wp-config.php file and make sure they match the WordPress database and user you created. Re-copy the original file from the download file and do it again if necessary.
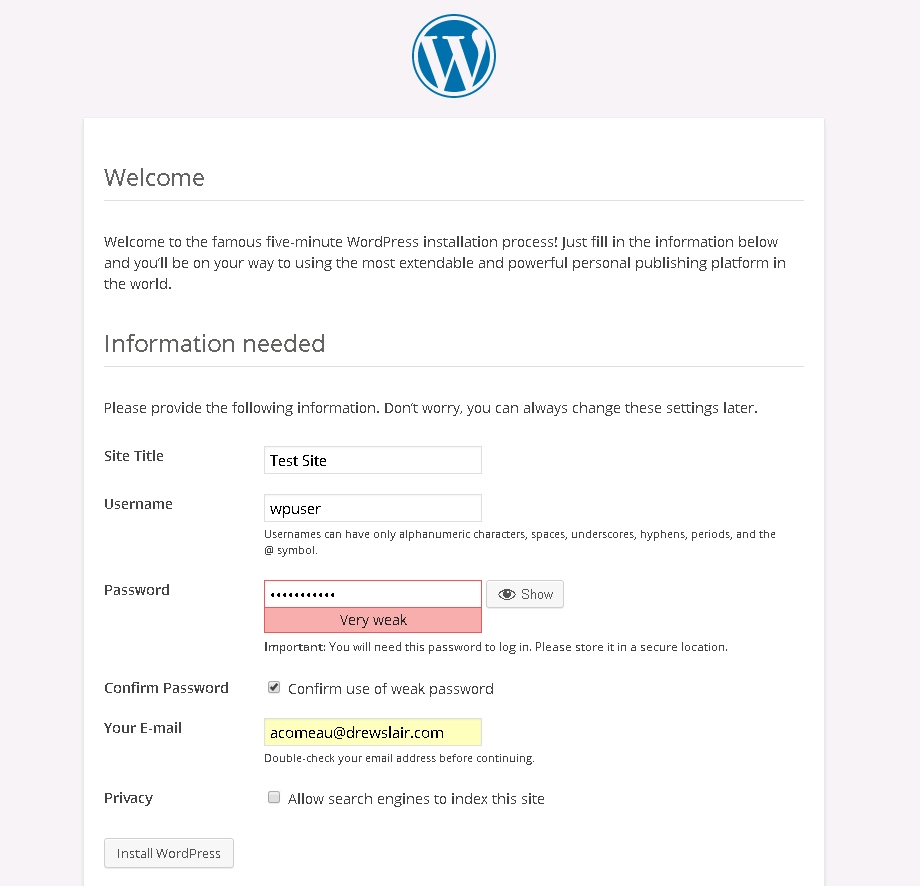
If everything works, the installation will ask you to enter a user name and password for an administrative user account along with your e-mail and whether you want search engines to index the site. Once you complete these settings, the installation will complete and you can login to your new WordPress site.
Conclusion
I’ve run through this process on a few different machines to try to catch as many issues as possible but I’m sure there are more ideas out there on how to fix various issues with IIS / PHP / WordPress. I didn’t even get into the use of a web.config file in the WordPress directory as I didn’t find it to make any difference during the installation. If you’ve had some experience with creating this kind of stack, I’d be glad to hear from you in the comments.
Find related products on Amazon.com ...


![WavePad Free Audio Editor – Create Music and Sound Tracks with Audio Editing Tools and Effects [Download] #1](https://m.media-amazon.com/images/I/71ePKI3-0tL._SL100_.png)
![WavePad Free Audio Editor – Create Music and Sound Tracks with Audio Editing Tools and Effects [Download] #2](https://m.media-amazon.com/images/I/71kkPFLKdDL._SL100_.png)
![WavePad Free Audio Editor – Create Music and Sound Tracks with Audio Editing Tools and Effects [Download] #3](https://m.media-amazon.com/images/I/71XNsD5NUGL._SL100_.png)
![WavePad Free Audio Editor – Create Music and Sound Tracks with Audio Editing Tools and Effects [Download] #4](https://m.media-amazon.com/images/I/71XJE-rWhbL._SL100_.png)
![WavePad Free Audio Editor – Create Music and Sound Tracks with Audio Editing Tools and Effects [Download] #5](https://m.media-amazon.com/images/I/71rpUeHuvtL._SL100_.png)

![Audacity - Sound and Music Editing and Recording Software - Download Version [Download] #1](https://m.media-amazon.com/images/I/510mwJSk09L._SL100_.png)
![Audacity - Sound and Music Editing and Recording Software - Download Version [Download] #2](https://m.media-amazon.com/images/I/71HecmJE3IL._SL100_.png)
![Audacity - Sound and Music Editing and Recording Software - Download Version [Download] #3](https://m.media-amazon.com/images/I/61pBBRoGhAL._SL100_.png)
![Audacity - Sound and Music Editing and Recording Software - Download Version [Download] #4](https://m.media-amazon.com/images/I/71Jw6wtwL+L._SL100_.png)




![TurboTax Deluxe 2023 Tax Software, Federal & State Tax Return [Amazon Exclusive] [PC/Mac Download] #1](https://m.media-amazon.com/images/I/41JjYR3TPGL._SL100_.jpg)
![TurboTax Deluxe 2023 Tax Software, Federal & State Tax Return [Amazon Exclusive] [PC/Mac Download] #2](https://m.media-amazon.com/images/I/41cFzw2W3wL._SL100_.jpg)
![TurboTax Deluxe 2023 Tax Software, Federal & State Tax Return [Amazon Exclusive] [PC/Mac Download] #3](https://m.media-amazon.com/images/I/51D48tGqioL._SL100_.jpg)
![TurboTax Deluxe 2023 Tax Software, Federal & State Tax Return [Amazon Exclusive] [PC/Mac Download] #4](https://m.media-amazon.com/images/I/41Dfj2yhvQL._SL100_.jpg)
in your MYSQL section you state to GRANT privileges like so
GRANT ALL ON wordpress TO ‘wpuser’@’%’;
but it should be
GRANT ALL ON wordpress.* TO ‘wpuser’@’%’;
otherwise the MySQL give permissions to the object wordpress in the database wordpress as follows
grant all on wordpress.wordpress to ‘wpuser’@’%’;
Could be a new version on MySQL, or not, but I had this issue with my installation when following this guide.
thanks for a great guide BTW
Thanks for the feedback.
In PHP 7, the MySQL extension is deprecated. PHP Info only shows MySQLi extension info. I had to search for a bit to verify this, so it may help someone else out to note this.
Very useful guide for system administrators. Most of the people will stuck at
“HTTP Error 500.0 – Internal Server Error
c:\php\php-cgi.exe – The FastCGI process exited unexpectedly
Error Code 0xc0000135”
you provided the solution for that error also.
Thanks
Glad you found it helpful.
On browsing the phpinfo.php file, i am getting below error:
PHP Warning: Unknown: failed to open stream: Permission denied in Unknown on line 0
Ofcorse I googled for this and tried the solution of granting full control to IIS User to the folder wwwroot. But, it doesn’t seem to work.
Kindly help…!
Thank you!! Very useful guide for a total beginner like me 😀 Went through it in under an hour. Thank you very much!
Thank you very, very much. This is very clear and was most helpful in saving me a lot of trouble as a beginner.
Thank you very, very much. This is very clear and was most helpful in saving me a lot of trouble as a beginner.
Very Useful Guide for System Administrators.
Thanks
Thanks for the info, however after spent some times I get
Not Found
HTTP Error 404. The requested resource is not found.
I don’t know what it wrong
Make sure IIS is setup properly and that the server has been started. You can check this in IIS Manager. Then make sure you’re using the correct URL. If both of those check out, I’d recommend going through and checking everything in the article step-by-step.
I am having this problem “Your PHP installation appears to be missing the MySQL extension which is required by WordPress” when I’m upgrade the php from version 5.6 to 7.2. Turns out that mysql extension is no longer supported in php version 7.2. It is now using mysqli extention. I am using old version of wordpress which still using mysql extension so the problem existed. So what I did is upgraded the wordpress to the core. I used the latest version of wordpress and used filezilla to put the new version to the site. I only overwrite the folder wp-includes and wp-admin replace all the files in the root folder.
Simply wish to say your article is as surprising.
The clearness on your post is simply great and i could suppose you are knowledgeable
on this subject. Well together with your permission let me to seize your RSS feed to keep updated with
impending post. Thanks 1,000,000 and please carry on the gratifying work.