Visual Studio provides a wealth of controls that you can use in Windows Forms apps including buttons, text boxes and combo boxes. In this chapter, we’ll add a few basic controls to the project to display the game output before moving on to the game code.
This post is part of a series on creating a roguelike game in C#. For the latest chapters and more information, please visit the Official Project Page on ComeauSoftware.com. The current code for this project is also available on Github.
You can also see a demonstration of this and the previous chapter on YouTube. Scroll to the bottom of the lesson for a link to the video.
Introduction
Visual Studio provides a wealth of controls that you can use in Windows Forms apps from buttons and text boxes for displaying information to combo boxes and menus for providing choices to the user. Each of these controls has its own set of properties and events that you can use to customize its operation and provide the exact experience you want for the users of your program.
The roguelike game that we’re developing in this series uses only a few of these controls but it’s enough for an introduction. In this chapter, we’ll add a few display labels and buttons to the form to show some status messages and the game map. In later lessons, we’ll add other controls for more functionality.
Setting up the game map …
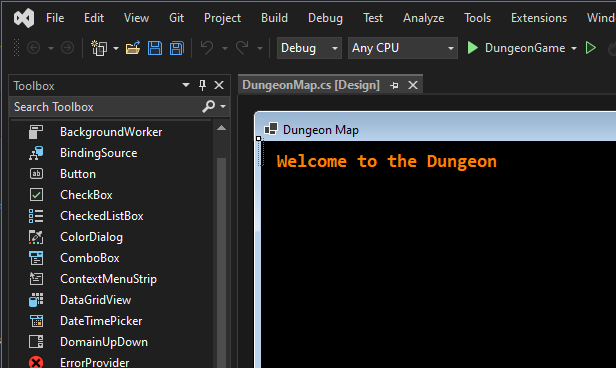
If you created your own project in the last chapter, you should have a basic Windows Forms app with a single form called Form1. The next step is to make it look a little more like the old Rogue game. Let’s refer back to the overview of the IDE environment.

The form design area (4) is where you’ll be doing a lot of the work for now. If you click anywhere within the form shown there, you’ll see the Properties panel (3) change to the properties for the form. That’s what we’ll be working with for now.
Also, under the Solution Explorer (2), you’ll see an item named Form1.cs. This is the actual file that holds the settings and code for this form. You can see two other files listed under it that complete all the information for the form – Form1.Designer.cs and Form1.resx. These files contain auto-generated code and settings and are mostly managed by Visual Studio.
You won’t spend a lot of time working with Solution Explorer because Visual Studio does a lot of the file management for you and even writes a lot of code on its own but the first thing I want to do is change the name of this file.
- Close the Form1.cs in the Design View by clicking on the X on the right of the tab.
- Select the Form1.cs file in Solution Explorer
- Use the F2 key or right-click and select Rename to change the name of the file.
- Change the name to “DungeonMap” or something similar and press ENTER.
- Double-click on the file to re-open it in Design View.
The file name doesn’t affect anything in the code but it does make it clear what object you’re working with in the Solution Explorer.
Form properties

Next, I want to change some of the properties on the form itself. Take a few moments to scroll through the Properties panel for the form. If you click on a few of the properties, you’ll notice that the name of the property and a description pops up at the bottom of the panel. This is helpful for getting familiar with the various properties of any object.
Here are the property settings I changed on the form for this project:
- (Name): DungeonMain – This is not the same as the file name that we changed earlier. This setting changes the name that will be used in code to refer to the object. I recommend not using any spaces within this name in order to keep things simple.
- BackColor: Black – You can type this in directly or use the dropdown control to select a color from one of three tabs – custom, web or system.
- Font: Consolas, 14pt, style=Bold – Again, you can type this in directly or use the ellipsis (…) button to bring up the font dialog box. A monospaced font is important for this project since we’ll be working with ASCII graphics that need to line up. If you don’t have Consolas on your system, you can download it or try another monospaced font like Courier New.
- ForeColor: 255, 128, 0 – This affects the text that will be shown on the form and is inherited by labels and other controls. The numbers represent red, green and blue color values and will create an orange color similar to the old amber monitor displays.
- Size: 1013, 682 – This size doesn’t have to be exact. You can also adjust this manually by clicking on the form in the design area and dragging the handles on the edge of the form.
- Text: Dungeon Map – This is mostly the title on the top of the form. You can also set it to your own chosen title.
Adding form controls
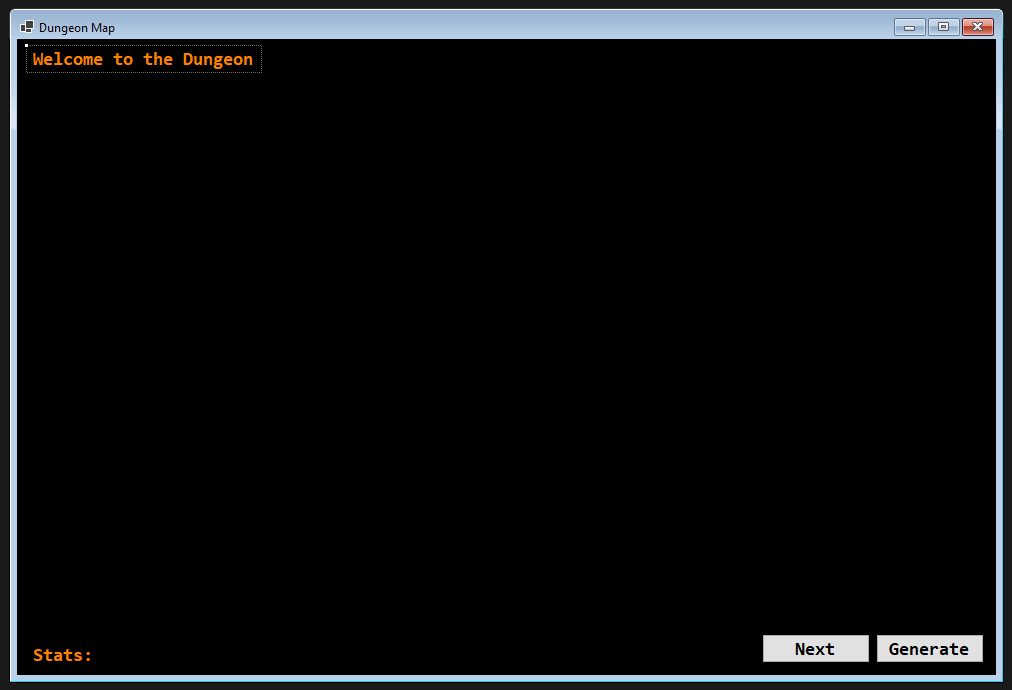
For now, there will be three labels and two buttons on the form. The map itself will be displayed in a text label as you’ll see later. In the ToolBox on the left of the screen, find the Button and Label controls. You can click and drag them to the form or click and draw them there.
Status Label
We need a way to display messages to the user at the top of the screen.
- Click and drag the first label onto the form. Drag it to the top left corner of the form. You’ll notice guidelines that pop up when you get close to the edge.
- Select the label to see its properties in the Properties panel.
- If you’ve set the Font and ForeColor properties on the form, the label will inherit these properties. Otherwise, set them as specified in the last section.
- Name: lblStatus, Text: Welcome to the Dungeon – We’ll be changing the text property through code later on and throughout the project but the placeholder text will keep the label visible for now.
Character Stats Label
We need a label at the bottom of the screen to show the character stats such as hit points and the gold collected. Drag another label onto the form and set the properties as with the last one.
- Name: lblStats, Text: Status – Again, this will be changed through code later.
- Anchor: Bottom, Left – This setting will cause the label to move with the bottom of the form if the form is resized, maintaining its place on the form. This can be typed in directly or you can use the dropdown guides to set it.
Buttons
It will be easiest if you add the buttons before the final label. You can place them as you like – I chose the bottom right-hand corner of the screen. Buttons will also inherit the form’s Font and Forecolor properties.
- Name the first button btnNext and set its Text property to Next. After we add the code, this button will let you test the new mapping display by generating the next map.
- Name the second button btnGenerate and set its Text property to Generate. This button will continuously generate a specific number of maps for extended testing.
Map Display
Finally, we’ll add the map display label.
- Drag the label control onto the form. It’s placement doesn’t matter because it’s going to fill the form.
- Name: lblArray
- AutoSize: False – This enables the label to expand to fill the form as shown in the Dock setting.
- Dock: Fill – This setting causes the control to attach itself to one of the form edges or to fill the form (also known as its container). You can use the dropdown setting to choose or type Fill directly in.
- TextAlign: TopCenter
- Remove the text from the label. Just leave the Text property blank.
- At this point, you’ll probably notice that the other controls that you put on the form seem to disappear. This is because the new label has covered them. Right-click anywhere on the new label and select Send to Back from the context menu. This will put the label in back of the other controls.
If you’ve worked through the instructions so far, you should have a form that looks something like this:
Exploring Further
We’ll add some code to these controls in future lessons but, for now, don’t forget to save the form by using CTRL-S or selecting one of the Save … options from the File menu.
At this point, you know how to create a new Windows Forms Application in Visual Studio, add new controls to the main form and change the properties of both the form and the controls. For extra practice, I recommend creating a second application called “Sandbox” or something similar where you can experiment with forms and controls on your own. Take some time to experiment with other form properties and controls. The more time you spend experimenting with the different features, the more you’ll understand how everything works.
If you would like to see a demonstration of this and the previous lesson where we created the new application, check out the video below